May 26, 2013

Procedure to create and use Groups in Outlook Express

We all know emails are considered as most secure and fastest way of communication. It is very obvious that every email account holder has their own contact list. Sometimes a situation comes like (on occasion, reply to clients, office use) user has to send same email to multiple recipients. It will become very hectic job if user will type every email recipients Address in the text field to send message. Instead of sending same email one by one, it is best if user will send email to all recipients in one click.

Microsoft resolves this problem by providing “Group” feature in Outlook Express. Creation of group will eliminates the need of CC and Bcc option as user has to just enter the name of group in Bcc part and send it to respective Group. By using this feature, user can create their personal as well as business groups to send same message to multiple people in a Single Click.

 Benefits of Creating Group
  • Save Time
  • Consistency
 Steps to Create Groups in Outlook Express
  • Start Outlook Express Email Application
  • Point to Menu Click on the Tool Option. User can also use Alt + T key to directly switch to Tool Menu

  • Using the Arrow key choose “Address Book” and press Enter
  • As Address Book appears click on NEW

  • After clicking on NEW section use arrows key to choose New Group

  • As user click on “New Group” a properties Dialogue Box appears
  • Enter the Group Name in the Edit Box of Dialogue Box and Hit Enter
            

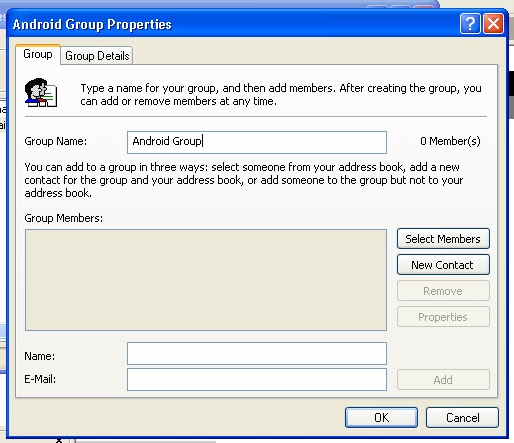
  • If user want to add Group Details then he can use “Group Details” section to fill the details

  • Now, user is ready to add members to the Group Created

Steps to Add Members to the Group
  • Proceed with the last step and click on Select Members.
  • After clicking on Select Members button use Down Arrow Key to select person from existing contact list. Repeat the process until you add all members to the Group


  • If user wants to add new person in the Group then Choose “Add” option to add new person in the Group.

  • To see your Group come to regular Outlook Express .Move to Contacts Section and scroll down to see the Group Name.

Steps to Send Email to a Specific Group
  • It's a very simple task to send message to particular Group
  • Open your Outlook Express mail application and click on “Create Mail button”.
  • In the 'Select Recipients' dialog box there is a list of your contacts shown, along with a search field to help you find a contacts name.
  • Click the "To :->" button (item) to put the 'Select Group' in the 'to:' 'Message recipients' box.

  • Click the "Bcc :->" button (item) to put them in the 'Bcc:' 'Message recipients' box.
  • Now, enter a message subject.
  • Type the message to be sent to the Group.
  • Click the 'Send" button to send the email.

By performing above steps, user can easily create Group depend on their need and can send message to a specific group.


May 22, 2013

Open Lotus Notes Mails in Outlook without any hitch

Lotus Notes email application is launched by IBM and MS-Outlook application by Microsoft. Both email application have their own file format i.e. .NSF for Lotus Notes & .PST for outlook. In daily routine it becomes arduous for a user to sustain their Lotus Notes account as their maintenance cost is not affordable for every one. User must have expertise in technical field to handle lotus Notes account. High maintenance cost of Lotus Notes is also an immense reason. These factors force a user to switch their email client from Lotus Notes to Outlook.

                             
Mostly users think that to change email application client is a very hectic & time consuming job. Their preceding email account (Lotus Notes) has all required information like contact details, email address, meeting schedule etc. So, if a user migrates from one email application to another email application (Lotus Notes to Outlook) then there is also need to export & import their all necessary information. Don't worry it’s a very simple task. I am sharing the complete steps to access data of Lotus Notes files to Outlook files. This process will complete in two steps,

Steps to approach your conversion
  1. Export all Lotus Notes Mail Files
  2. Import all Exported Mail files to Outlook
Follow these steps to Export Lotus Notes Mail Files
  • Firstly open your Lotus Notes Mail Application
  • After opening Click on the "Mail" tab
  • Point to menu bar, move to “File" option
  • After moving start the “Export” wizard by clicking on “Export” option
NOTE: - When "Export" wizard starts, user will have several options to select the format for the exported file from Lotus Notes.
  • As user will import them to Outlook so it is advised to Choose "Tabular Text" or "Structured Text”
  •  Now, Click “Continue” to start the export process.
  • To stop the process click on “Export”.
  •  Process ends & Exports the mail file easily
Follow these steps to Import the exported mail file in MS-Outlook.
  1. Run Microsoft Outlook application.
  2. Inside the “File" menu click on "Import and Export”.
  3. After opening of wizard entitle as "Import and Export" Hit on "Next"
  4. Now, choose the format to export the file.
  5. User have option to choose "Comma Separated” Values OR "Tab Separated Values”
  6. Tap "Next."
  7. In the "Export" wizard browse the file exported from Lotus Notes.
  8. To complete the process Hit on "Finish"
After performing these steps user will easily migrate their lotus notes files to Outlook. However, there may be possibility user will face difficulty in performing these steps. There is one more option to open NSF files in Outlook environment. User can also use third party tool available in market entitle as NSF to PST file converter. These converter tools also provide you assurance of no data loss during conversion process. Hope this post will be helpful for you.

May 14, 2013

How to Create & Open PST file in Outlook 2013?

While working with PST file, one thing user should keep in mind that if the size of PST file reaches or exceeds beyond the specified limit then, it affects the Outlook performance adversely. So, for proper working of Outlook, it is advised to create new PST file that can be used as a mean of archive for storing old data.

Steps to Create Outlook Data File:-
  1. Firstly install Outlook 2013 Application
  2. Start your Outlook 2013 application
  3. Point to 'File' Menu then, Select “New Items”
  4. After clicking on 'New Items' user will migrate to 'More Items' & from 'more items' submenu choose 'Outlook Data File'
  5. Now, browse for the location where you want to save your Outlook Data file
  6. Enter the file name or hit “OK”
  7. Your PST file is created successfully
  8. Now, See left side of your Outlook folder pane it works exactly like your existing folder.
Steps to Open Outlook Data File:

Once you have created the PST file, follow the below steps to open it.
  • Go to the file tab
  • Hit on 'Open & Export' and click on Open Outlook Data File
NOTE:-user can also open the Outlook Data file from Documents/Outlook Files Folder.

Password Set

User can also apply password to their PST files for security purpose. By applying password to the PST file, user can prevent unauthorized access to the confidential mail data. Moreover, to increase the security of your PST file, it is advised to change your password on timely basis.

Steps to change password of PST file:
  • Point to 'file' then, Move to 'account settings'.
  • Choose the Outlook Data file on which you want to apply password then, click on Settings.
  • Hit 'Change Password'.
NOTE: - If you are using Outlook with Exchange Server then use your network password to access your Outlook account data.
  • After clicking 'change password', a Password wizard opens that prompts for your “Old Password” & “New Password”. Enter the details & save.
NOTE: - Your password must be up to 15 characters & case sensitive.
  • Hit OK to set password.

    Additional Info:-
  • Password is applied to select Outlook Data File only.
  • User can also set Password for individual folders within the Outlook Data File.
  • Once user changes the password and he can log in with new verified password. He can select the check-box provided within the password wizard to make the system automatically store it for future use. Whenever user log in in to his account then, he will not require entering the password again and again.
Its a wise choice to archive your previous Outlook data in PST file .Otherwise, the increasing PST file size may affect your daily Outlook tasks and later on, it may cause severe data corruption issues that might be hard to recover.

May 13, 2013

How to Backup Outlook Personal Folder Files by using Add-in?


In our daily life, we usually face inconvenience with our computer system due to virus attack, sudden power failure, hard drive failure, accidental deletion of files etc. These factors not only affect our system performance but can also cause damage to our important data. Same is the case for Outlook PST files. PST files plays a very significant role in MS Outlook for functioning of Outlook Email application; there comes need a PST file Backup.

Microsoft provides a free utility named as “The Microsoft Outlook Personal Folders Backup tool” to take back up of Outlook emails. This tool is an add-in that will automatically automate the backup process for PST files. It is available in prior version of Outlook 2000, Outlook 2002, Outlook 2003, and Outlook 2007. To work with this tool in Outlook2010, user has to configure it manually. Moreover, this tool provides an option to take back up of selected PST files at regular or different intervals of time. Priorities of back up will be set by user. You can easily download this add-in from the Microsoft website:-

Note: - This tool is not recommended as an enterprise back-up solution. If you are using outlook with Exchange Server then there is no need to backup the PST files as they are backed up automatically by server administrator. The Personal Folders Backup add-in backs up only .pst files. Additionally, this tool only provides settings that individual users can configure.

Steps to use The Microsoft Outlook Personal Folders Backup tool
  • Start Outlook application
  • Point to file menu Tap on Backup.
  • Now, Click on Options
  • Select the .pst file for back up
Steps to use The Microsoft Outlook Personal Folders Backup tool for 2010

Firstly configure Outlook to allow the Personal Folders Backup add-in to run automatically on exit. By default this add-in does not work with Outlook 2010 because of new Fast Shutdown functionality in Outlook 2010. To fix this problem automatically, click the Fix it button or link. Click Run in the File Download dialog box, and follow the steps in the Fix it wizard.

Firstly add the following registry data to complete the backup process at shutdown
HKEY_CURRENT_USER\Software\Microsoft\Office\Outlook\Addins\Microsoft.OutlookBackup.1
DWORD: Require Shutdown Notification
Value: 1

NOTE: - while modifying registry, apply every step with proper precaution. One wrong move will lead to serious problems or may be user has to reinstall the operating system. Microsoft doesn't completely assure user for solution of problem. User will do modifications in registry at their own risk.

To do this, follow these steps.
For user of Windows XP &Windows Server 2003

  •   Point to start hit on Run.
  •   Type regedit in the Open box
  •   Hit enter
For Windows 7, Windows Vista, Windows Server 2008 and Windows Server 2008 R2

  • Click Start,
  • Type regedit in the Open box
  • Click regedit.exe in the search results.
  • Now, Locate & click on the following sub key:
  • HKEY_CURRENT_USER\SOFTWARE\Microsoft\Office\Outlook\Addins\Microsoft.OutlookBackup.1
  • Click on Edit & hit New - DWORD Value.
  • Rename the value to Require Shutdown Notification.
  • Right click on Require Shutdown Notification
  • Click Modify.
  • Type 1 in the Value data box of Edit DWORD Value dialog box
  • Click OK & Quit Registry Editor
     Note: Perform these steps only one time:

  • Start Outlook application.
  • Click on Add-ins tab in the Ribbon.
  • Click the Backup button.
  • Now, tap on Options & select the .pst files for back up.

Backup must be saved on a hard disk & don't try to spread that back up on multiple hard disk. While changing backup options, select the storage location which has maximum space to save .pst file.


May 8, 2013

Introduction to “Message Preview” feature in Outlook-2013


Microsoft introduced MS-Outlook 2013 with some advance new features like connectivity with social media, message preview & manymore. Here, I will discuss in brief about message preview feature of Outlook 2013.

To grow your organization as well as your business, users need to act smartly by responding every message quickly but sometime fails to do so. It's obvious, you receive & send a lot of email in your daily routine & sometime there is also a situation when you are too busy & don't have time to open every message.

In this situation, MS-Outlook 2013 is a boon for you as it provides you the feature of showing message preview, On the basis of this; you can easily scan your inbox and select the priority of message to be respond. User can also use quick commands like delete, mask, unmask flag to perform operations. This feature is also present in Outlook 2010. For this, users have to move into new window to reply for message. In MS Outlook 2013, user can reply in the same window. With the message preview option, user can easily follow the important project conversation in a very short & convenient time. User can also disable or customize this feature if it is not useful for them.

Following are the steps to adjust settings of “message preview” option:

By-default Outlook shows message preview in one line user can adjust setting by following few steps:-

STEPS:- 

        1. Start Outlook 2013 application   

  1. 2 In the Outlook Ribbon Move to View icon & Tap on it


    3 After tapping Message Preview option appears with different sub options as shown in fig below, User can select any feature according to requirement & also disable this feature by selecting OFF .


    4 In the next step, user can change Preview settings for every folder or Current folder.


    5 After applying changes, you will see the preview of messages account to mode selected in Step3.


    6 In case, if user don't want to avail this option then simply click on Off option as displayed in image.


    Start adjusting the setting of your Outlook by applying these simple steps & save your precious time by just viewing the preview of your message. Hope this information is helpful for you.