Jul 29, 2013

All about Outlook Express Stationary


Messages plays a vital role in every field either it’s a business field or an IT firm. Most of us choose emails for safe and secure mode of communication and if, I talk about email Outlook Express is my favorite email client because of its ease and simplicity. It provides user various options to send emails using files like images etc. This make message more attractive and informative. 
 
              To make message more attractive user can use default images available in the folder named as ‘Stationary folder’. Moreover, user can add more images to this folder by following its manual procedure. Let me discuss in brief about this folder: Stationary is a message template created by using images, colors etc for outgoing emails. Message created by using stationary provides user more options to adjust the Settings of their message like Font settings, text color and position etc. This folder is located on underwritten address
Location: C:\Program Files\Common Files\Microsoft Shared\Stationery
In this post I will describe all steps to
  • Configure default stationary folder
  • Create stationary folder
  • Add signature automatically using stationary
Snapshots to Configure default stationary folder

For user’s of Outlook Express6
1 Open Outlook Express email application

2 Now, head towards Tools menu do click on Option

3 After clicking on options chooses compose tab from the option provided. It will display a window as shown in figure below:

4 After clicking on compose enable the checkbox entitle as ‘MAIL’ and click on ‘SELECT’ button as shown in fig

User can also choose option News:


5 From the Select Stationary window select stationary you want to use and click ‘ok’


6 Now, again click ‘OK’ and your default Stationary folder is configured

Use can also create stationary according to their use. I am sharing steps to perform such types of action: 
 
Snapshots to create stationary
1 Open Outlook Express email application and target Create Mail 


2 Now, select the drop down menu placed just next to Create Mail button. It will display a list and select Stationary option from the list

3 Now, user will see a interface entitle as Select Stationary . Select the button Create New from the interface and proceed


4 Welcome screens will appear and wait till this screen load and click on Next Button

5 After clicking on Next button a ‘Stationary Setup wizard’ will open asking for parameters (picture tile, position, color etc) to be set. After seeing preview proceed to ‘Next’.


6 Now, user can select Font setting for their mail by selecting appropriate option from the list and proceed to NEXT


7 After complete settings Stationary Setup will ask for file name. Enter the desired file name and target Finish button to complete the process


8 Stationary created is added to Stationary Folder with the name used to create , Hit ‘ok ’ to proceed


9 Now, user can use created stationary to compose mail as shown in figure below


Snapshots to add signature automatically using stationary in Outlook Express

To add more clarity to your message user can also send their business card automatically in their emails in form of signature. Do follow the following steps to perform this operation:

1 Head towards Tools menu do click on Option

2 After selection of ‘Signature’ tab enable the check boxes to create new signatures and user can also edit their signature using this option. Click ‘ok’ to proceed


3 Enter the text in the ‘Edit Signature’ box and proceed. Click ‘ok
4 ’Now, compose mail user will see automatically signature will add while sending email

I hope information provided above will help you in conveying information to user more smartly.


Jul 24, 2013

How to export all Windows live mail contacts and calendar data to Outlook 2013?


Windows Live mail (EML) and Outlook (PST) both email applications have their own importance. But due to some extensive and vast features of Outlook, most of the users prefer to choose Outlook as their email application. Now a day’s social networking has a great value. Outlook 2013 is introduced with a new feature of connecting social profile, attachment reminder, Skype connectivity with their outlook account and many more new features are also introduced.
    
These up gradation in features of Outlook make users think of switching from Windows Live mail (EML) to Outlook (PST). To convert EML file to PST file is not as troublesome because various EML to PST file converter tools are present. But to access Windows Live Mail contacts and calendar in Outlook, user has to export them manually. 

In my post, I am sharing steps to access Windows Live mail calendar and contacts in Outlook. 

Following are the steps:
Exporting Contacts from Windows Live Mail to Microsoft Outlook 2013:
1 Start windows live mail application.
2 Select Contacts folders to export and choose Comma separated values (.CSV) files.
3 After performing such steps a CSV Export window will open containing Browse button.
Choose option browse to select the Desktop folder.
4 Now, enter text in the file name save the file by clicking on File button
NOTE: File name will be “WLM Contacts”.
5 Select the field’s user want to export and finish the process by clicking on Finish button. Wait till the process complete
NOTE: Select most common fields only if user is confirmed about the information i.e. First Name, Last Name, Email address and Telephone. May be this process will take some time because of messages present in the files user is exporting.
6 Close the Windows Live Mail application
7 Select Excel file and open it.
8 Open the desktop folder and click on show all files.
9 Select file created above with name “WLMContacts.csv” and open it.
10 Now, select file Select File, and then click Save As.
11 Now, change the extension of file to CSV (Comma delimited) (*.csv), and save them
12 In this step, while saving the file user is asked to replace existing file or overwriting the file or keep the file in CSV format then click yes.
13 Now, close the Excel sheet
14 Start Outlook application and select file named as contacts.
15 Click on Import/Export icon
16 After opening of window select option to Import from another program and proceed
17 Previous steps will highlight comma separated values
18 Now, again select the Desktop folder b clicking on Browse
19 Select he contacts from the file named as WLM Contacts.csv
20 Now, contacts folder will be highlighted and proceed on NEXT to finish the process

Steps to exporting calendar from Windows Live Mail to Microsoft Outlook 2013:-
1 Log in into Windows Live mail account to select the Calendar folder.
2 Select the account type from Windows Live account and Outlook account to share the calendar information.
3 From the option given choose option ‘share the calendar’ and save the changes.
4 Send a link to people with whom user want to share calendar by enable the checkbox.
5 To save changes click on links provided and proceed
6 Choose the link that contains information user want to share and do click to email the link to respective person to share the calendar details.
All above are the steps to export all contact details and calendar to outlook. Windows Live Mail doesn’t have option to synchronize the emails automatically with Outlook. To access that email messages in Outlook, user has to export email message manually. Following are the steps to export the mail messages.

Steps to Export the mail messages
1 Start both email applications: windows live mail and Outlook
2 Head towards Windows Live Mail application and choose Email messages from Export section categorized in the File menu.
3 Now, Select format of Microsoft Exchange and proceed 
4 After doing this a message is displayed containing text “All email will be exported to Microsoft Outlook or Microsoft Exchange”
5 Now, choose appropriate mail folders from the list of all email folders and Export them.
6 Wait till process complete. After completion of process a dialogue box will appear on Window named as “Export Complete dialog box”.
These steps only applied to Export all Windows Live Mail contacts, calendars and emails to Outlook 2013 (32) bit only.


Jul 17, 2013

How to access web mail account (Gmail) using desktop email client apps (OE)?


Emails are the backbone of every business either its small business or a large scale business. In the list of email application clients, Outlook Express is very famous email client associated with Windows XP. Sometimes there comes a situation when user has no access to internet. To overcome this situation, user can configure their desktop email application client to their webmail account and can access their email easily.
In this article, I am sharing screenshots to configure Outlook Express account to Gmail account. In case the user is using Outlook as their email account then they can also configureOutlook account with web mail. Before proceeding further, first user should meet the following requirements to configure their account.
Requirements to set up Gmail account with Outlook Express:
  • Login access details of their Gmail account.
  • Server’s Name. (Incoming & Outgoing mail server)
  • Complete details of port settings
Depending on user’s choice, user can enable account option to select whether they want to configure via using IMAP account or POP server.
This configuration process divided in two parts i.e.
  • Setting of Gmail account
  • Setting of Outlook Express account
Snapshots to configure Gmail:
1. To initiate the process, log in to your Gmail account


2 After Log in move to Settings and do click on that 

3 Now, head towards “Forwarding and POP” and select the radio button entitle as “Enable POP for all mail” and save changes.


Screenshots to configure Gmail account with Outlook Express:
 
1 Login to Outlook Express application.


2 Point to Tools Menu, move cursor to Accounts option as displayed in Image below:

3 After clicking on Accounts screen, displays an image entitle as “Internet Accounts” 

4 Now, Click on button highlighted as “Add”. After clicking, it will show three options


5 In the next step, an Internet Connection wizard will open asking for Display name. After filling the entry, click on button “Next”. Keep one thing in mind while editing the Name: name must be same as name of your Gmail log in.

6 In this step, user will enter their email address in the text box. Follow the above instruction while entering user’s email id that should be same as id of user’s Gmail account. After filling the credentials, proceed to NEXT.


7 After proceeding on Next Step, Internet Connection Wizard will give user option to select the mail server type. As I mentioned above, user can choose server type according to their availability. While choosing option, they must aware of server’s mail address. Here, I am taking POP3 in to consideration
  • For Incoming Mail text: ‘imap.gmail.com’
  • For Outgoing Mail text: “smtp.gmail.com”
For pop user’s
  • For Incoming Mail text: pop.gmail.com
  • For Outgoing Mail text: “smtp.gmail.com”
I am showing both images:


                                      Figure For POP3 users

8: Enter the log in credentials of user’s Gmail account. After login, user must enable their Remember Password box. Hit on NEXT to finish the Log-In process 


9 Now, user will see a screen giving information for successful completion of process. To set server setting click on Finish button.

10 This step will return user to the “Internet Accounts” page. Now, User will select the “Properties” button “by doing right click

11 Do right click on section entitle as Properties. This action will display Properties windows including all Servers’ settings. This will also authentication for servers.


12 Now, Move to Advance Tab to create a secure SSl connection. User can create SSL connection by entering the port no of SMTP and POP3 protocol. Remember IMAP users will enter port no in the text box of IMAP protocol and click on OK to finish the process.

 
By following above instructions, user can easily send and receive their web mails using their desktop email application client and enjoy their work without any interruption.


Jul 16, 2013

How to make Hyperlink work in MS-Outlook, if it refuses to open?

Email application works as an interface between receiver and sender to pass information. MS Outlook is one of the most famous email application client existing in the market. Its new version Outlook2013 extensive and vast features (face book connectivity, hyperlink creation, attachment reminders etc.) makes it famous among the users. But when I was using Outlook & try to open hyperlink then I encountered an error message i.e.

This operation has been cancelled due to restrictions in effect on this computer. Please contact your system administrator.
Your organization's policies are preventing us from completing this action for you. For more info, please contact your help desk.”

When Outlook user’s click feverishly to open the link attached within the email, they get disappointed as Outlook gives no response to their query & shows above error message. This is the most irritating situation, I guess! This situation makes user thinks this is the fault of Outlook, but let me clarify that this is not the Outlook error. Following are the common reasons behind this error message:
  • Error in registry keys or
  • In appropriate installation of Internet Explore
  • Corruption in Internet Explorer Possible cause
Solution to resolve this error:
Microsoft describes two ways to resolve this error:
  • By Resetting the Internet Explorer settings.
  • By Import and exporting registry keys from another computer.
Steps to Do Editing in Internet Explorer Settings:
For Newer version of Internet10:
  • Open Internet Explorer and move to Tools option and click on Internet Options. Hit Advance Tab and choose Reset Settings.
  • Now, select the checkbox entitle as “Delete personal settings”
  • Click on close the window and restart browser.
  • Repeat the first steps and move to Programs tab and select button Set programs
  • Set Microsoft Outlook as your default program.
  • Choose Internet Explorer by scroll up again to default programs list
  • Close the application
For Internet Explorer 8
Start Internet Explorer.
1 Point to Tools menu chooses Internet Options.

2 Move your cursor to “Advanced tab” and choose “Reset”.


3 Choose Program Tab and click on Set Programs
    

4 Now choose MS-Outlook as default program and hit OK

Steps to Import and Export Registry Key from other computers
Export the Keys
  1. Point to Start Menu click on Run


2. Type regedit in the Open Dialogue box and proceed to next step


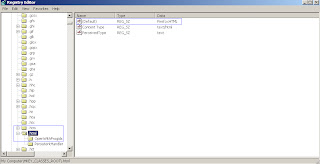
3 In the next step point to locate the registry key value as highlighted in the fig shown below:

4 Now, move your cursor to the File menu in the Registry Editor and target on Export 
 
5 After clicking on Export save the location address of file.
NOTE: All registry files are saved on user’s hard disk or floppy disk


6 Now, enter the desired file name to save the file and exit the Registry editor.
Import the Keys
1 Firstly copy the registry key to the affected computer and do double click on .reg file
User will receive the following error after doing this
For Windows 7 users:
Are you sure you want to6 Now, enter the desired file name to save the file and exit the Registry editor.
Import the Keys
1 Firstly copy the registry add the information in drive: location file was copied to\file name.reg to the registry?”
For Windows 8 users:
Windows 8 - Adding information can unintentionally change or delete values and cause components to stop working correctly. If you do not trust the source of this information in C: Users\<your logon>Desktop\regkey.reg, do not add it to the registry.”
2 Target OK to terminate the process
Now verify the default value of “HKEY_CLASSES_ROOT\.html” this key is html file


1 Point to Start Menu clicks on Run and Type regedit in the Open Dialogue box and proceed to next step

 
2 Now, do click on under shown registry value


3 After clicking on the value entitle as “String (Default) is "html file” check whether it’s an html file or not


4 Do right click on file and chose option modify


5 Now, Enter the file value in data box.

6. After entering the values click Ok and exit the registry editor.
It is advised to do modifications in registry carefully as a little mistake leads to heavy loss of crucial data. However, if still error occurs then user must contact to Microsoft support.

Jul 12, 2013

User guide to access Outlook Express address book in Outlook

Outlook Express stores all contact information in wab file. When user migrates from one email application to other then there are several options available to convert all files. When user switches from Outlook Express to Outlook then there are various converter tools present in the market to perform DBX to PST file conversion. These tools will convert all DBX files to PST files but will not be able to migrate address book.
Address book plays a vital role in every communication. As I have mentioned above that .wab file stores all Outlook Express contact information. To use this file in any other email application, user has to follow manual process. There are two options described by Microsoft to access Outlook express contact list in Outlook. User can choose any option according to their convenience: 
 
            In first case, if user is upgrading its program using Windows address book during Outlook Active Setup then set up will convert all address book entries to the Outlook contacts.
In another case, if user is not using Outlook Active Setup then he can choose underwritten options to use contact list.
  1. By using Import and Export wizard
  2. By sharing contacts
Effective steps to use Outlook “Import and Export” wizard
In Outlook, you can use the Import and Export Wizard as the interface for Address Book conversion. To convert a WAB file, follow these steps:
  • Run MS-Outlook application.
  • Points to file menu choose option “Import and Export”


    Choose option entitle as “Import Internet Mail and Addresses” and proceed.


    • Now, select the version of Outlook Express from the list of version i.e. 4.x, 5
    and proceed to Next.

    Pick out the address from the list of products and convert them. Click next. 
    Select any combination of the Mail or Addresses from the items listed 

    NOTE: There are some rules present for conversion of files but steps to convert address are same
     
  • Now, proceed to select location to save imported address data. 

    NOTE:
    Choose location you use to install Outlook initially i.e. 
     
  • Contacts folder for the “Internet Mail” user’s for installation of Outlook 98.
  • Destination for Corporate or Workgroup Personal Address Book is Outlook Contacts.
    Choose Duplicate items option to complete the process    

    Effective steps to share Outlook Contacts with Outlook Express
  • To access contact list of Internet Mail option, user can use share option to access Outlook Express contact list in Outlook. Steps to do this:

  • Enter text Wab in the text box open after clicking on RUN. 


  • Choose one option from the Address Book Tool menu


  • Now, select options entitle as Share contact information and share address book between Outlook Express
  • Now, close all the application
  • Restart Outlook Express application to see the changes.
  • Now, Address book is ready to access in Outlook.
We all know Outlook Express store all information in form of folders. That folder may be an individual folder or may be a folder for group.

Effective steps to drag Address Information directly to Outlook
Outlook Express store information in form of identity folder’s or groups .To use that folders or group directly, user can directly drag them to Outlook by using following method:
  • Point to Start Menu target Files and Folders.
  • Enter text .wab file in the Open box
  • Choose the WAB file user want to locate and Tap two times on WAB file
  • Open Outlook email application
  • Adjust system screen to see both contact folder and file
  • Now, open wab file and choose any entry. Select an entry from the WAB. Drag it to the Contacts folder.
  • Now, save the entry in Contact form and close the application.
NOTE: Use shift and ctrl button to select contiguous and non-contiguous groups of entries or press CTRL and select entries.
Aforementioned steps will help user in importing their address book from Outlook Express to Outlook.