May 5, 2013

Significance of .NK2 files in Outlook?


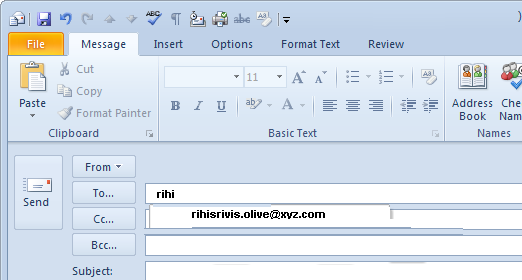
In Outlook, when user starts to type any name in the edit box or other fields like To, Cc, Bcc etc then, outlook recommends a list of names to user named as “.nK2 file”.

About .nK2 file:
This file is normally hidden in Outlook & comes under miscellaneous file category.
File location depends on the operating system used by user:-

In Windows7: drive: \Users\<user>\AppData\Roaming\Microsoft\Outlook
In Windows Vista: drive: \Users\<user>\AppData\Roaming\Microsoft\Outlook
In Windows XP: \Documents and Settings\<user>\Application Data\Microsoft\Outlook

 Nickname cache is stored in the user “profilename.nk2” file. Here, note down one thing that the profile name used is the name of user's outlook profile name. When user runs Outlook 2013 application for first time, nickname cache is imported in the form of a hidden message in user's default message store. In case, if user is using outlook account with Microsoft Exchange account then user's nickname cache is imported in the Exchange mailbox.

Remember that after ending of “profilename.nk2” file import process; “profilename.nK2” must be renamed to “profilename.nk2.old” because when user will run outlook application second time, user's nickname cache is not imported.

Outlook 2013 does not use .nk2 file for maintenance of nickname cache, its default message store is the only location for nickname cache & all the updates done in the nickname cache. In case of multiple Outlook profiles, every outlook profile is merged in to new Outlook 2013 nick name cache on first start of outlook by using that multiple profile. After merging of profiles, there is also need for renaming them from “one .nk2” file to “.nk2.old”. When user upgrades from old version of outlook to newer version i.e. Outlook 2013, then he also needs to import .nK2 files manually as they are not imported automatically.


Steps to import old.nK2 files from your previous Outlook account to new Outlook 2013
The .nk2 file folder location i.e. %appdata%\Microsoft\Outlook
Note: The .nk2 file must have the same name as your current Outlook 2013 profile. By default, the profile name is "Outlook."
  1. Check the profile name by following these simple steps:
  2. Click Start & hit on control panel.


    Now, double-click on Mail.


    After clicking, a “Mail Setup dialog box” appears


    Now, click on Show Profiles.


    Again tap on Start & Run.


    Enter following text: - outlook.exe /importnk2 & Hit OK.  


    After the Import process is complete, hit on OK.


    Note After you import the .nk2 file, the contents of the file are merged into the existing nickname cache that is currently stored in your mailbox. Also remember that the nk2 file is renamed with an .old file name extension when you start Outlook 2013 first time.


    Now, user can easily import old list of names from old computer to new computer as well as from prior version of outlook to new version of outlook.


Apr 30, 2013

Steps to import messages in to Windows mail from Outlook Express


Whenever user wants to change their operating system from Windows XP to Vista then Windows automatically imports all messages & contacts from Outlook Express to Windows Mail. Sometimes, there might be a situation when users don't want to upgrade its operating system but needs to transfer all Outlook Express messages on current system running with Windows Vista.

Microsoft provides you an option to transfer these files & messages via manual method or using ”Windows Easy Transfer” but it is more approachable if user uses manual method to transfer message from Outlook Express to windows mail. Following are the steps to transfer messages in to Windows mail from Outlook Express:
For Windows XP user, Follow these steps:

Outlook Express messages folders are hidden in Windows. Firstly change the settings of hidden folders
  • Point to Start
  • Click on Control Panel
  • Move to appearance & Themes
  • Click on Folder Options.
  • Click on View tab point to Hidden files and folders
  • Hit on Show Hidden files & folders.


    2. Now, move to C:\Documents and Settings\your user name\Local Settings\Application Data\Identities\ {your Windows user identity number}\Microsoft\Outlook Express to locate Outlook Express folder.

    3 Now, copy all content of Outlook Express folder in to the Documents folder of machine having Windows Vista.


    Info: - You can also choose location to store copy of Outlook Express folder according to your convenience by following these simple steps.
    On the computer running Windows Vista, do the following:

    1 Go to start button of Windows Mail


    2 Click All Programs & point to Windows Mail hit the “File” menu & point to Import click on Messages.

    3 Open Microsoft Outlook Express 6 & proceed on Next.


    1. Make sure while importing mail from a Select OE6 store directory & Hit on “OK”.


      5 Browse for the Outlook Express folder you copied to this computer, and then click the folder once to select it. 


    6 Now, click on “Select Folder” & click next.


    7. Click to import all the folders OR Selected folders & Select the message folders you want to import


    8 Click on “FINISH” to complete the process.


    In this way, user can easily import all Outlook Express message in to Windows mail. 


Apr 29, 2013

Steps to synchronize lotus notes application with Smart Phone (Android)


A lotus note is the email application designed by IBM. Most of business user's use lotus notes as a PIM (Personal Information Manager) to manage their emails, calendars etc. IBM designed a software to synchronize user's lotus notes account with their smart phones (Android) named as “Lotus Notes Traveller”. This software is easily available absolutely free of cost & can be downloaded from the website of IBM. Here is the full overview of Lotus Notes Traveller:  

Step 1: Start your Android application
Step2 : Press the "Menu" > Tap "Settings" >”Applications"
Step3: Click on configure Android & install lotus notes application


Step 4: Now, Agree to Lotus Notes Terms & Conditions proceed to “Next” & Click on “Continue”.


Step 5 Now user needs to enter user name & password of lotus notes application along with server address. After that click on Next


Step 6: Now click to install the lotus notes traveller application


Step7: After installation completes, Click on Open to activate the device Administrator


Step 8: After Activation, Now user can sync contacts along with Mail and Calendar & press OK.

Add Info: - Contacts on your device must be merged with the Contacts on your Lotus Notes account. Although Contacts syncing is an optional process, you can also look up contacts in the Lotus Notes directory without Syncing Contacts.


Step 9: Now, the entire icons associated with Lotus applications will now be available on the Applications menu.


Step 10: Now, Tap on Lotus mail to see Inbox & in case if user is not able to see Inbox & receive a message then user must sync for that folder by point to “Menu” then select “Sync Now”


Step 11: - By default only user inbox is synchronized. To synchronize other folder tap on Show Folder & select Sent. 

Step 12: Make sure your Sent items are subscribed & in case if they are not subscribed you need to add them by point on Menu > Subscribe.
 Step 13 Now, After subscription user will be able to save message from server
Step 14 Now, user can also send, receive & compose message


By using lotus notes traveller application user can easily access their lotus notes email account & can save their valuable & precious time.


Apr 25, 2013

Troubleshoot “cannot open the Web Navigator Database” error in Lotus Notes


Lotus Notes is designed by IBM as a desktop e-mail client application used for business purpose. All Lotus Notes files are handled by a server named as “IBM Domino”. This email application stores all our information in form of NSF files such as BookMark.NSF, Busytime.NSF, Headline.NSF, and Perweb.NSF” & all these NSF files have their own functionality & significance but here, I am discussing in brief about the Perweb.nsf file.

Perweb.nsf:- This Notes Data Directory file is extended as “Personal Web Navigator database” responsible for storing web browser information as well as previously viewed pages by user’s. These databases are also used as resource cache as they improve the response time & also provides user's the facility of downloading the web pages in offline view e.g.:- c:\notes\data\perweb.nsf.

Perweb.nsf file issue
As a lotus notes user, when user accept any message in form of HTML & tries to open the message, sometime user is unable to do so and also images rooted in HTML message have a “red X” mark in place of every graphic. A pop up window appears & shows the message “Can not open the Web Navigator Database”. This situation gives you a clear warning about the corruption of local Perweb.nsf file.

Remedy: - The solution of this problem is so simple. User has to simply delete the Perweb.nsf file and recreate the file to enjoy the services. Steps to check whether database is corrupted or not:-

To check Location of document: - Check the Location of Document by Open your Internet browser i.e.
  1. Internet Browser is with Notes.
  2. Retrieve/Open pages from Workstation.
  3. Now, Point to Advance Tab in basics section.
  4. Check for Load Image settings whether it is “Always” or not.
As a user, if you are using proxy server or a port in Internet browser, first make sure that your Lotus Notes Locations settings are same as the settings of proxy server.

To Check Settings in Internet Browser:-
  • Go to Internet Options
  • Proceed to connections
  • Check LAN Settings
To Check Settings in Lotus Notes Location settings:-
  • Open Basic Tab
  • Go to Proxy Configurations.
If these settings are ok then check Advanced/Web Retriever tab:

If it is also ok then perweb.nsf database gives the indication of corruption. There are two methods of recreating the Perweb.nsf file either user will use the template named as perweb50.NTF or recreate it manually.

Following are simple steps to recreate the Perweb.nsf file:-

Steps to rebuild the perweb.nsf
  • Firstly, shut down your Lotus Notes client application.
  • Make sure about per web template file named as PerWeb50.NTF is existing or not in the “Data folder” if file doesn’t exist then copy it over from another workstation
  • Now ,after performing above step rename your perweb.nsf to perweb.old
  • Start your Lotus Notes client application.
  • Now, Edit current location document by changing the Internet Browser settings to "Notes" & try to open web page in the Lotus Notes Browser. This step will create new database "Perweb.nsf”.
  • Now open your Lotus Notes web browser & go to Actions/Internet options point to “Presentation page”.
  • Change the settings of MIME to Rich Text & HTML.
  • Edit your current location document by again changing the Internet Browser settings to "Notes with Internet Explorer”.
  • Try to open the received mail again.
By using these steps, user will troubleshoot the “Cannot open the Web Navigator Database” error.

Apr 7, 2013

How to migrate Outlook Hot Mail connector features to MS Outlook 2013?

Outlook Hot Mail connector is a Microsoft tool used to synchronize Hotmail accounts with Outlook. Synchronization helps you in accessing your data from anywhere & also keeps you up to date. In Outlook 2010, while you connect Outlook with hotmail account as well as features, there is need of hot mail connector, and you have to upgrade its account and other features manually, this is very time consuming & tough process.

Microsoft sort out this problem in outlook 2013 by eliminating the need of “Outlook Hotmail Connector”. When we configure our hotmail account with Outlook 2013, it automatically upgrades our hotmail accounts as well as features by using EAS (Exchange Active Synchronization). Outlook 2013 uses its last e-mail address used by the user to receive & send the message & complete the process. However, still there are few features that user have to migrate manually like tasks, journals, notes etc as they are imperative for future use. I am explaining here steps to migrate journals, Tasks & Notes manually:-

Steps to Migrate:

A. In the first step exports your journals, Tasks & Notes to an Outlook Data file (.pst) by following the underwritten steps:-
  1. Go to File & open Import/Export
  2. Tap on Export a file & click Next
  3. After exporting file click on Outlook Data File (.pst) & hit Next
  4. Select your mail box which you want to export by clicking on Name & E-mail address & go to NEXT
Info: - First make sure, your Include sub folders box is checked to export everything in your account, including mail, calendar, contacts, tasks & notes. Also remember user will able to export one account at a time. To export multiple accounts, repeat these steps again after completion of exporting one account.
  1. Browse location to save Outlook data file (.pst), Click OK after saving
  2. If you’ve already used export before & the previous folder location and file name appear. User must type a different filename before clicking OK.
  3. If you are working under Options to export an existing Outlook Data File (.pest), you must specify the operation to perform when exporting items that already exist in the file.
  4. Hit Finish.
ADVICE:-
Always apply password to newly created Outlook Data File (.pest) otherwise Outlook start the Export immediately. To apply password to newly created PST file, fill the credentials then, Create Outlook Data File, dialog box appears & hit OK. Now enter the password in the Outlook Data File Password dialogue box & Click OK.

If existing Outlook Data File (.pst) is already password protected & user want to Export that file then users have to simply enter the password in Outlook Data File Password dialog box and hit on OK.

B. Now, Import them in to Outlook 2013 by following underwritten steps:
  1. Go to File & open point to Export click on Import/Export this will open the Import & Export wizard.
  2. From another program or file choose the option IMPORT & go to NEXT
  3. Select your Outlook data file (,pest) & proceed to browse the .PST file which you want to import
  4. There are various duplicates files present choose the Options to select the file & hit NEXT.
  5. While created PST file in above steps if user apply password to the Outlook data file then fill the password & click on OK.
  6. Don't need to change the default settings. User just set the options for importing items.
  7. Finish the process.
ADVICE: -
Sometimes, user needs to import or restore only a few items from .pst. For this purpose, Open the pst file & then move to the Navigation Pane & then drag the items from Outlook Data File folders to their existing Outlook folders.

C. In the final step, use CtrlC & CtrlV command to copy and paste the individual items that you require in to the Hotmail/Live account.

By using above steps, user can easily convert outlook hotmail connector features to Outlook2013.


Apr 4, 2013

Effective steps to repair Outlook Data File (PST) in Outlook 2013 using Inbox Repair Tool


E-mails are the most protected & trustworthy application used for message passing in IT & Business world. Although there are different email clients existing in the market but most commonly used application is Outlook as it provides us good features like social network connectivity, attachment reminder & many more. Every outlook user must be aware that their account information like e-mails, tasks, journals, calendars etc is saved in a PST file. But what if your PST file got damaged?
There are various reasons of PST File Corruption:
  • Power Failure
  • Virus Attack
  • Improper System Shut Down
  • Direct log out from Outlook
  • PST File Size Exceeds
When PST files got damaged than you may lose your fundamental information. To diagnose the trouble, Microsoft provides a free utility named as scanpst.exe. There is no need to install this tool individually because when you install Outlook 2013, it automatically get install with it. This tool sort out the problem by read-through the data file structure & in case if there is any error occur in data file structure, scanpst.exe tool will reform them & rebuild the headers for outlook.

Steps to Repair Outlook data files (.ost & .pst)
  • Close your Outlook Application.
  • Open the drive in using Windows Explorer addressed as drive: \Program Files (x86)\Microsoft Office\Office15 folder.
Info: - Program Files (x86) is a substitute for user of 64-bit version of office or a 32-bit version of Windows
  1. Now, open Scanpst.exe and tap two times on it.
  2. After tapping a text box appears asking for name of file you want to scan. Enter the name of the Outlook Data File (.pst) in the text box & start Browsing.
  3. For specification of scan log options tap on Options & select appropriate option.
  4. Hit Start.
  5. Check whether errors are found or not, then start the repair process to fix the errors.
A backup file is created during the repair process. To change the default name or location of backup file which is created during repair process, use following steps:-
  • Enter name of backup file box
  • Enter a new name
  • Click on Browse & select the file
6. Click Repair.
7. for proceeding further Start Outlook application first.
8. Now open the profile associated wit your Outlook data file that you are trying to repair.
9. Press Ctrl+6 to open the folder list view in the Folder Pane.
      
       Now, Check for your 'recovered personal folders' in the folder pane. This folder contains your 'default outlook folders' or a 'lost & found folder'. You will find your recovered folders are usually empty; actually it is a rebuilt .pst file. Location of recovered items is 'Lost and Found folder'. To drag the items in the Lost & Find folder, create a new .pst file and after completing the moving items process, remove the Recovered Personal Folders (.pst) file including lost & found folder.
If Inbox Repair tool get failed to repair data:
May be you are not aware that by default, Inbox repair tool creates a .pst file with same name but the file extension is different. File extension is .bak & storage location for .bak file is same as the location of original PST file. In case, Inbox Repair tool failed to recover items then you can recover them from the .bak file. To recover that data open your original PST file and follow the few steps:-
  • Firstly make a copy of .bak file
  • Entitle the file name with a .pst extension e.g. (bak.pst).
  • Proceed & Import the bak.pst file
  • Move unrecovered items to the new .pst file created by you.
  • A copy of the log file is saved to the same folder as the .pst file
By using above steps, you can repair your PST file easily and prevent your valuable data from corruption.

Mar 30, 2013

Solution to Open EML Files in MS-Outlook 2007


EML files are designed to open with Windows Live mail. Now a day’s Outlook becomes famous among  business users as well as IT users as it provides us facility to store our information on our local disk. This feature is not avail in Windows Live Mail. That's why most of user's decide to change their email application from Windows Live mail to Outlook. A big problem occurs when a windows live mail user wants to open his EML file in Outlook but unable to do so as MS-Outlook does not support EML file format.

Microsoft solves this issue by providing Outlook 2007 post-Service Pack 1 hot fix package. This package is easily available on Microsoft Site. You have to download the hot fix package and activate it. To enable hot fix registry package, you have to modify the registry that may be difficult because if you apply any command in incorrect manner, it will lead to serious problem of data loss. So it is advised to backup your registry so that if any error occurs, you can restore them.  
  
How to Activate Hot Fix

To activate this hot fix, follow these steps:

 Close your Outlook 2007 Application.
 Now, Start Registry Editor
   
  If you are using Windows Vista Follow these Steps
       Click on Start button of windows
       Open your Search box 
       Type regedit and Tap ENTER.
   
 User Account Control permission: - If you are sanctioned for an administrator password or confirmation then type your password, or click Continue.

   If you are using Windows XP
1.       Start your windows or
2.       Apply Run Command
3.       Open your search box & type regedit
4.       Now, Locate & Select the following registry sub key:
 HKEY_CLASSES_ROOT\Microsoft Internet Mail Message\shell\open\command
5.      Apply Right-click command & Modify.
6.      Type following  "%Program Files%\Microsoft Office\Office12\OUTLOOK.EXE" /eml "%1"
7.       Tap OK.
8.      In File menu, Click on Exit to Close Registry Editor.

After activation of hot fix package, you can use following steps to open the .eml file

Note: - Need not to implement the previous registry data if you use underwritten command-line to open .eml files.

ü  Open your Command Prompt window.
ü  If you are a user of Windows Vista,
ü  Hit on Start button of windows
ü  In Start Search box type command prompt,
ü  Tap ENTER.

        User Account Control permission
        If you are prompted for an administrator password or confirmation, type your password, or click Continue.
        In Windows XP,
·         Move cursor to Start button & Click Run,
·         Apply cmd command in the text box & Tap Enter
·         Now Type "%Program Files%\Microsoft Office\Office12\OUTLOOK.EXE" /eml"<PathToEmlFile>", and then press ENTER.
If you are using Windows Vista

ü  Click on Start button
ü  Move cursor to All Programs & Click on Accessories
ü  Now click Run.
ü  Apply cmd command & Enter.

 User Account Control permission    If you are authenticates for an administrator password or      confirmation, types your password, or click     Continue.
 Type "%Program Files%\Microsoft Office\Office12\OUTLOOK.EXE" /eml "<PathToEmlFile>", and then press ENTER.

Now, check whether the problem is fixed or not .If your issue is not resolved then you can use third   party converter tool to fix this issue.