Aug 26, 2013

Why to Rebuild Mac Outlook2011 database?

Entourage email application uses single identity folder to store .rge file format. This is a drawback of Entourage email application because sometimes there may be a situation when user’s .rge file got corrupt and due to that user has to lose their all valuable data.

Microsoft sort out this problem by launching Outlook for Mac users. Mac Outlook was introduced with feature of storing data in to separate files instead of saving data in to a single file. Additionally Outlook has stronger database as compared to Entourage. Every email application has its own pros and cons. Every Outlook users face few common problems when they logged into their Outlook account. The only solution to troubleshoot these problems is rebuilding of database. In this post I will share all steps for rebuilding of database.   

Situations that leads to creation of new database


  • Unexpected shut down of system.
  • Unexpected behavior of Outlook like selected items would not open.
  • Outlook contacts information is not visible to user. When user will open their contact list of outlook it will display a blank line.
  • Outlook creates problem in contact display.
  • Added information is missing in Outlook calendar, events or contacts
  • Outlook search option will not work properly. As user enters something for search it does not display the same result.
  • Outlook starts displaying a blank Office Reminders window.
  • Outlook will no more display the clippings in Scrapbook
 Steps to rebuild identity database

  1. In first step quit all applications.
  2. Now, find out the free space available on the hard disk. Use following steps to identify the free space on hard disk.  
  • In the Finder section select ‘Home’ option.
  • Now, Open the Documents folder and after that Microsoft User Data folder.
  • Now, Open the Identities folder of Office 2011 and do click on that.
  • On the File menu, Move to Get Info section categorized with File section and select Get Information.
  • User will easily get size of the database used as well as free space on disk.

  3. After getting the disk size, first discover the current identity and take back up of current identity. Steps to take back up of current identity

  • In the Finder section select ‘Home’ option.
  • Now, Open the Documents folder and after that Microsoft User Data folder.
  • Now, open the office 2011 identities folder by doing right click on identity folder.
  • After doing right click select Duplicate option, by doing so a copy of identity folder is created
  • Now, quit all applications.

Taking back up is necessary because if user face any problem in creation of new database then there are chances of data loss. To avoid such unplanned conditions, there is need to create a backup copy of database. 

  4. To rebuild the database first of all quit all applications.
  • Start Outlook 2011 application by holding the Option key on the Keyboard.
           NOTE: There is one more option to open the Database utility.
  • Open the Application folder present in Database utility 
  • Start browsing for Database utility.
  • After browsing the Utility open the Microsoft Office 2011 folder
  • Now, open the “Microsoft Database Utility.app” present in the Office folder.

  • Open the Database utility window to select the database
  • After selection of database click on Rebuild
  • This will open the window named as “Rebuilding Main Identify”
  • After completion of process a user will receive a message "Your database was rebuilt successfully."


Start Outlook again to check whether problem is resolved or not. In case if still problem exist then follow the following steps


  • Click on Done.


Start Outlook again to check whether problem is resolved or not. In case if still problem exist then follow the following steps


5. To sort out the problem create New Identity. Steps to create New Identity

Outlook has capacity to store multiple identities at one time. May be in group of multiple identities, there is possibility for damaging of one of identity or may be more. To resolve this problem, there is need for creation of new identity.


  • Steps to create New Identity on Mac Outlook
  • Close all other application running on system.
  • Click the Outlook icon and it will open a “Microsoft Database Utility”
  • Now, Click on plus [+] to add a new identity 


  • Enter the name in the new identity section to save the identity
  • Identify the created Identity.
  • Now, set the newly created identity as default identity. To select default identity choose option “Set as Default”
  • Now restart the outlook to check whether problem is resolved or not.


I hope information provided to users is beneficial to them and help users in creating database error free.


Aug 13, 2013

Common Apple Mail Issues

As I have already introduced user with the Apple Mail and their extensive features in my previous post. We all are aware of fact that no email application is perfect. Same is also true for Apple Mail application. While working with Apple Mail, I have faced few issues that make me think for another option.  I Googled and installed Mac Outlook 2011 on my Mac system but before proceeding to Mac Outlook 2011. Let me discuss common Apple mail issues that every user face.

Issues with Apple Mail:

Internet Connection Problem:
Sometime user comes under a situation when there is slow internet connection due to reasons like hardware problem, weather problem etc. In such type of situations when user send emails using their Apple Mail account then they receive multiple copies of their same email. To resolve this problem, it is advised to use fast internet connections.

IMAP Account Problem: Sometimes incoming and outgoing server don’t accept password. In this case, user is not able to send and receive email and creates problem. This type of situation usually occurs when user is not able to upgrade their IMAP account. User can easily resolve this problem by having a backup of their password account.

Issue with Email Saving: According to email design structure when user sent email then it must be saved in their Sent item folder. But usually it does not happen with IMAP protocol. When user set their account to IMAP protocol then there is also need to set the folder settings to save emails. It is advised to choose folders carefully to save file.

Preview Mail Issue: While working with Apple Mail when user sends any file attachment then there is no option of having previews of file attachment. In fact user is not able to open file attachment before saving of emails. Moreover user is not being able to set their signature in HTML format. 

Above mentioned are the common issues with the Apple Mail. User can resolve these issues by applying few steps but if still problem persists then it’s good for user to switch to Mac Outlook. Let’s have a look on Mac Outlook 2011:

Introduction of Mac Outlook 2011:
Mac Outlook 2011 is developed by Microsoft. Prior to Mac Outlook 2011, its previous version is Mac Outlook 2008 that is easily comparable with Microsoft Office 2010. Mac Outlook 2011 supports for .RGE file format. Previously Microsoft introduces Entourage email application now it is replaced with Office for Mac 2011.

Default Location of Outlook 2011 files in Mac
Outlook 2011 database file: ~/Documents/Microsoft User Data/Office 2011 Identities/Main Identity/
Outlook 2011 storage folders: ~/Documents/Microsoft User Data/Office 2011 Identities/Main Identity/Data Records

Extensive Features of Mac Outlook 2011
·         Mac Outlook 2011 can be integrate with variety of email servers
·         Calendar can be viewed within user mail
·         Flexible user interface
·         Mac Outlook 2011 has wide variety of scheduling meetings at one place
·         All old archived PST files can be easily imported to PST files
·         Mac Outlook 2011 can be easily connected with Windows Sky Drive
·         User can customize their documents on Windows

To access Apple Mail files in Mac Outlook, user must convert all files in .rge file format to access information safely. To know more about Apple Mail to Outlook 2011 conversion process view this presentation given below:


Brief Introduction of Apple Mail


Emails are the most secure way of communication. Every email client has their own specifications and compatibility factor. In Mac system default email application client is Apple Mail. Let’s have a complete overview of Apple Mail. In previous time, Apple Mail is known as ‘Mail.app’. Firstly ‘Mail.app’ email application is launched by NeXT as ‘Next Mail’ later on it was adapted by OS’X Mail application.

Introduction of Apple Mail
    Apple Mail provides supports for all basic protocol like SMTP, POP3 and IMAP and can easily work with all popular email client i.e. Yahoo mail, Gmail, AOL Mail, Mobile Me , ioS and Exchange. Additional benefits of using Apple Mail are its Active Sync support and its icloud account connectivity that makes it more flexible for users. Latest version of Apple Mail is Version5 introduced with Mac OS Xv10.7.
 
File Structure of Apple Mail:
Email applications has their own procedure to save emails as well as respective folders associated with user’s profile like sent items, Notes and inbox. Apple Mail supports for MBOX file format in their old versions (before 10.4) but in new versions (10.7), Apple Mail follow .emlx file format. The basic difference that lies between MBOX file format and .emlx file format is their storage structure. Let’s have a look on these file formats.

Introduction of MBOX files:
MBOX files store all messages in a single file. MBOX is abbreviated as Mailboxes. In MBOX file structure, all messages are concatenated in a single plain text file. 

Default files location of MBOX file:
 “/User/Library/Mail/Mailboxes/ directory”
NOTE: Location of MBOX file differs from client to client.

Introduction of EMLX files
In new versions of Apple Mail, .emlx file format is supported. EMLX files are abbreviated as Mail messages. EMLX file format messages can be separated in to single files and thus become easily available on searching. User can easily view their .emlx files in text editor.

Default files location of .EMLX file:
"~user/Library/Mail/Mailboxes/[mailbox]/Messages/"folder."~user/Library/Mail/[account]/INBOX. Mbox/Messages/" folder. 

Remarkable Features of Apple Mail

Multimedia Support: Apple mail provides support to multimedia messages. User can easily send video clips and photos to receiver. Additionally user can easily apply drag and drop option to attach multimedia file to the emails. It saves user time. Additionally user can use inbuilt tools to adjust the settings of image.

Manageable Inbox: Apple Mail has manageable inbox. User can adjust the settings of their mailboxes. They can easily change their font settings, color choice and text size and many other settings. User can also set the priority of emails according to their use.

Advance Calendars: Apple Mail has advance calendars settings options. User can see multiple calendars in a single window. Moreover user can also get time to time update (change in meeting schedule etc) via emails. User can also create invitations and can invite their other friends via emails.

Support Multiple Mail Account: Apple Mail supports for multiple mail accounts .User can also configure their multiple mail accounts with Apple Mail and (list is mentioned above) avail benefits.

Mail Connection: Mail connection feature is present in Apple Mail. Sometime user is not able to send mail to their respective client. User doesn’t need to get resolve the problem as Apple mail is automatically enriched with features of “Connection doctor”. User must click on “Connection doctor” button to resolve this error.

 I hope all above information is quite helpful to know about Apple Mail.


Aug 8, 2013

Switch without any hitch from Outlook Express to MS Outlook


Outlook Express and MS-Outlook both email applications are child of same parent i.e. Microsoft. These two application use DBX and PST file to store information. I have already introduced about DBX and PST files in my previous post. Although both these email applications are same, the only difference lies between their functionality and technical architecture i.e.  

Ø Outlook supports for Voice support features
Ø Outlook  provides connectivity with Exchange server
Ø Outlook supports for features like personal calendar, contact management etc these features are missing in OE

Including these differences still there are few scenarios that make user to upgrade their email application from Outlook Express to Outlook. These common scenarios are:

Circumstances:

Ø Change in work environment
Ø Up-gradation in OS (Operating system)
Ø Better Email Features

These are the common reasons for switching of mail client from Outlook Express to Outlook. Here, I will explain the complete procedure for accessing Outlook Express data in Outlook. But these steps applicable to application installed on same computer.

This process will complete in two steps:

1) By Importing data
2) Set default email application client

Steps to Import all messages, account settings, addresses book and rules for Outlook versions 2002, 2003 and 2007


For Mail settings:
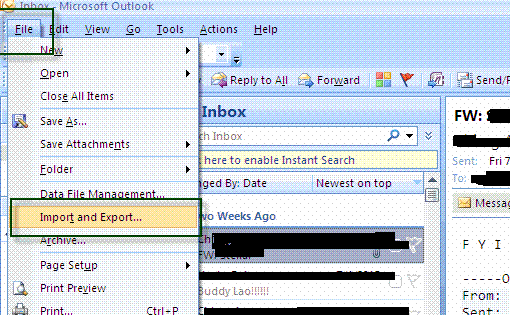
Open Outlook mail application and target for Import and Export.


Now, select for option entitle as “Import Internet Mail Account Settings”


 Move to Outlook Express and proceed by clicking on NEXT.


Enter name and email address in the text box


NOTE: Make sure about the name because user's profile is shown by this name only.
Now, check for incoming and outgoing mail servers also ensure about account log in credentials.


Reminder: Enable the check box entitles as Secure Password Authentication (SPA) and then log on. This will work for version 2.5 POP mails.


Now, select the method to connect to Internet and proceed


Import easily all your email account settings.


For Outlook Express messages, address book and rules

Open Outlook mail application and target for Import and Export.
Now, select for option entitle as “Import Internet Mail & Addresses”
Select method according to Outlook version:
For Outlook 2007, Select Outlook Express 4.x, 5.x, 6.x
For Outlook 2003, Select Outlook Express 4.x, 5.x, 6.x.
For Outlook 2002, Select Outlook Express 4.x, 5.

NOTE: Make sure all check boxes are selected for labels “Import Mail, Address Book and Rules”. Import the data in to one of the following i.e. Contacts Folder of Outlook or the Personal Address Book.

Ø Select the option to handle duplication issue during Import process
Ø Select the option to handle duplicity during import
Ø Click Finish

Another Option:

B Set Default email application-client: There are two methods to select default email application client.

Option 1: In Outlook mail application in the Tool menu select Option and select the Other Tab
Now, choose check box entitle as “Set Outlook as a default program for E-mail, Contacts and Calendar.

Steps to Import all messages, account settings, addresses book and rules for Outlook versions 2010


For Mail Accounts:

ü Open Outlook 2010 application and select the Menu
ü Open the “Import and Export Wizard” by clicking on Import tab

OR

ü Open Outlook 2010 application and select the Menu
ü Open advanced tab to Export. This will open the Import and Export Wizard
Further procedure is same as describe for version (2002, 2003, and 2007)

For Outlook Express messages, address book and rules:
All procedure is same. But make sure of underwritten points:

·        User can't import rules to version Outlook 2007 and 2010 as these rules subset has been extended and blessed with more features as compare to earlier version.
·         Set User can import data to Outlook Contact folder only.

Another Option:
Default email application-client:
·        Open Outlook 2010 application and select the File > Menu in the Ribbon.
·        Select the General tab and proceed
·        Now, choose check box entitle as “Set Outlook as a default program for E-mail, Contacts and Calendar.


Above mentioned is the procedure to access Outlook Express data in to Outlook. There is also one more option to access data easily i.e. use of third party converter tools to convert DBX file to PST file format. The DBX to PSTfile converter tool is well equipped with advance technique that is more secure and safe.
          

Aug 6, 2013

PST File Size Limit Solution

Previous version of Outlook is followed by “ANSI” file format that used binary values to store information and made PST file a non -Unicode data file. This data file had a hard weird limit i.e. 2 GB. With such file size limit, it became tough for a user to maintain their PST file.

Microsoft resolves this trouble in newer version of outlook by following “UNICODE” file format blessed with UTF-16 endian and 64 bit pointers. This overcomes the problem of 2 GB file size. In previous version (2003 to 2007), PST file size limit was widening up to 20GB while in latest versions (2010 and 2013), limit extends to 50 GB. But the main problem is still same when user starts to use newer version PST file in old version of Outlook because it is beyond the size limit defined by UNICODE file format

To resolve this problem, Microsoft provides several options to minimize the file size limits for Outlook data file.
  1. By doing editing in Windows Registry
  2. By reducing the size of PST file by splitting it in to small size PST files.
NOTE: To reduce the PST file size of newer version to open with older version, user has to export the data from reduce PST file to new PST file. Here are all steps to perform export operation:

Steps to export the data from reduce PST file to new PST file
  1. In the first step, user has to start Outlook 2010. User can also start Outlook 2013 later but with a condition i.e. Outlook contains user original.pst file limit with 20GB file size.
  2. Indicating on File menu click on info.
  3. Move to Cleanup Tools and then
  4. Hit on Archive and it will results in opening of an “Archive dialog box”.
  5. After opening of Archive dialogue box do the underwritten changes:
  • Open “Archive this folder and all subfolders and Enable” them.
  • Now, user sees a list of all folders and will select the .pst file to archive.
  • This will open a drop-down list of all Archive items.
  • Now, user will select the date on the basis of items archived. Make sure user will select date on which maximum items are archived.
NOTE: Selection of date also depends on too many factors.
  • Now, after performing all these steps, user has to archive the messages. To archive message, user has to select the path of destination .pst file.
  • There may be condition user has to archive email messages in large amount. If true then it is advised to create a new.pst file.
Remarkable Point: To identify the age of an item Outlook (2010 and 2013), user should use the modified date on messages during the archive process. There is also possibility that archive process will not archive messages according to user needs.

In this situation, user is helpless as archive process will not work anymore to play down the Outlook data file size (.pst) to less than 20GB. What a user can do to minimize the size of outlook data file? User can perform splitting operation on .pst file. After completion of operation, move the messages manually from large .pst file to another .pst file. To save time in moving folders take on these steps:

Steps:
  • Open large sized .pst file and destination .pst file in Outlook.
  • Select the large sized .pst file folder
  • Do right click on messages to migrate them to new small .pst file
  • Now, Move folder
  • After moving folder a “Move Folder dialog box” will appear
  • Choose the destination.pst file
  • Process is complete.
By using above mentioned steps, user can easily split large PST file in to smaller size PST files.

Aug 1, 2013

How to resolve Outlook Error “Can not create file”?

Outlook email user’s generally facing an error while opening and saving an email attachment in Outlook: "Cannot create file". The root cause behind this error is “Temporary Internet files folder”.

These files are saved on server just because of this, user is not able to do modifications in these files as they don't have administrator permission and result in error.

Error message:


To resolve this problem, Microsoft provides two options to user. Either user can download the software from website or user can fix the problem by their own.

Steps to resolve problem with the help of Microsoft:
It's a simple procedure to resolve the problem, user has to download the software's .exe file and run the file simply and must follow all the instructions present in the “Fix it Wizard”.

Remarkable Point:
  • Instruction manual is provided in English. If user wants to follow different language then user can choose different languages.
  • May be user is not able to download this software on system. Not to worry! User can save this software in any hard drive or CD and install software on the affected system.

Steps to resolve problem manually:

In this process to save temporary files Outlook will use folders entitle as:
temp” folder. Problem can be fix by doing modifications in Windows Registry key. Remember while doing modifications in windows registry make sure user has a backup of their register because any wrong step will lead to re installation of Operating system.

For user's of Outlook 2000
  • Open Registry Editor
  • Now, Locate the registry key:
  • After allocating registry key hit on underwritten link:
HKEY_CURRENT_USER\Software\Microsoft\Office\9.0\Outlook\Security\Outlook SecureTempFolder
  • In case, if user's MS Outlook is configured with terminal server then use the following registry key:
HKEY_LOCAL_MACHINE\SOFTWARE\Microsoft\Windows NT\CurrentVersion\TerminalServer\Install\Software\MICROSOFT\Office\9.0\Outlook\SECURITY\OutlookSecureTempFolder
  • To modify or edit registry open the Menu and apply Edit Command
  • After applying Edit command click on Modify
  • Now, Enter the underwritten value:

Value data: Path and name of the folder that you want to use
  • Now, Exit Registry Editor.
For user's of Outlook 2003
  • Go to My Computer
  • Targets drive C and do double click.
  • Point to File menu click on New and then proceed for Folder.
  • Give the folder a name as “temp0”.
  • Come to start option
  • Point to Start hit Run
  • In the text box type text as regedit, and proceed
  • Locate the registry key and Click OK:
  • HKEY_CURRENT_USER\Software\Microsoft\Office\11.0\Outlook\Security\
  • Now, open the right pane and do double click on Outlook Secure Temp Folder.
  • Now. Open the field entitle as Value Data field
  • Enter the following text: type C:\temp0\
  • Close the Registry Editor and restart computer.
For user's of Outlook 2007

All above procedure is same for Outlook 2003. Difference lies between only Locations of registry. i.e
HKEY_CURRENT_USER\Software\Microsoft\Office\12.0\Outlook\Security

For user's Outlook 2010
  • Go to My Computer
  • Target drives C and do double click.
  • Point to File menu click on New and then proceed for Folder.
  • Give the folder a name as “temp0”.
  • Come to start option
  • Point to Start hit Run
  • In the text box type text as regedit, and proceed
  • Locate the registry key and Click ok:
  • Locate and then click the following registry key:
HKEY_CURRENT_USER\Software\Microsoft\Office\14.0\Outlook\Security\
  • Now, open the right pane and do double click on Outlook Secure Temp Folder.
  • Now. Open the field entitle as Value Data field
  • Enter the following text: type C:\temp0\
  • Close the Registry Editor and restart computer.
Aforementioned steps will easily resolve the error. If the user still found the error then user has to contact Microsoft customer support to resolve the error.